Updated: 24 February 2025
When calculating insights for your clients, Aider use a default combination of Xero settings where available, and country specific standards. This means getting started with Aider is as simple as adding your clients - no major set-up process required.
But if the numbers, tax periods and due dates don't look correct, you can check the calculation settings in the affected client's 'Client Settings' screen.
How to get to the 'Client Settings' screens
- Go to the Clients Insights section.
- Find the client you’re interested in.
- Click on
 in the top right (next to the client's name).
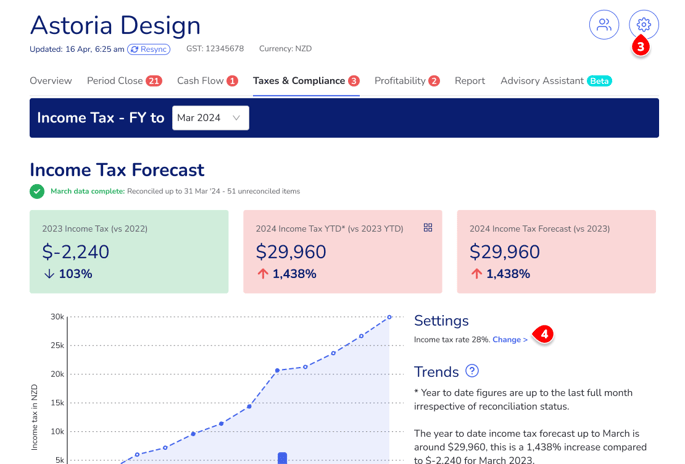
 - For insights that use calculation settings, the current setting will be shown just above the 'Trends' summary. Click on the 'Change >' link to get to the 'Client Configuration' (calculation settings) screen quickly.
'Client Settings' screens
- Manage Aider calculation settings in 'Client Configuration'
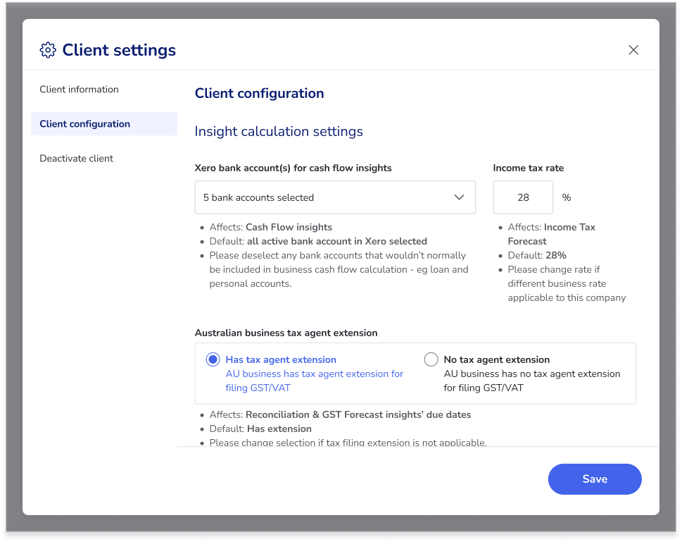
- Xero bank account(s): By default the Advisory Platform will use data from all bank accounts associated with the client’s Xero account. If the client has any loan or personal accounts associated with their Xero account, this may affect the accuracy of cash flow and GST calculations. Unselect any bank account that you wouldn't normally include when calculating the business' cash flow, GST, and profitability metrics.
- Income tax rate: By default, the Advisory Platform uses 28% to calculate the company income tax forecast for New Zealand and non-Australian clients. For Australian clients, the default rate used is 25%. Change this if a different tax rate applies to this client.
- Australia agent BAS lodgment program: This is for clients in Australia and affects the due dates shown for GST/BAS. By default, this is set to "Tax filing extension applies". Change this if this client does not qualify for GST/BAS filing extensions.
- Manage custom tags & check settings Aider inherited from Xero in 'Client Information'
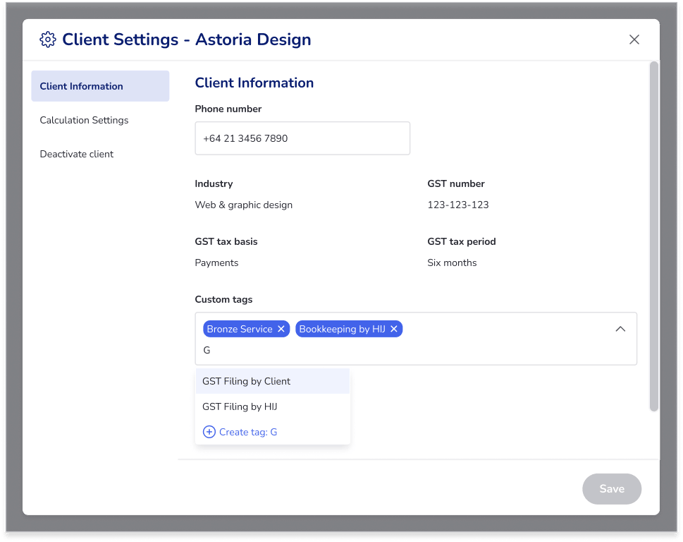
- Categorize the client using Custom Tags. This will enable you to filter your client list on the Dashboard to suit your needs - e.g. get a list of clients who do their own reconciliation, or clients on Tier 1 service package. Use this to improve focus and efficiency, or to compare clients within a custom group you define via Custom Tags.
TIP: You can also add tags to multiple clients in one go on the "Clients Management" screen. Just select the clients you want to tag, use the "Bulk Tagging" bar to specify the tags, the click "Add Tags" to apply the tags to the selected clients. - Check the client's industry and GST information (GST number, tax basis, and tax period) in ‘Client Information’. These are based on information in Xero and used for various calculations.
- Add the client's phone number under 'Client Information'
- Categorize the client using Custom Tags. This will enable you to filter your client list on the Dashboard to suit your needs - e.g. get a list of clients who do their own reconciliation, or clients on Tier 1 service package. Use this to improve focus and efficiency, or to compare clients within a custom group you define via Custom Tags.
- Deactivating a client to manage what clients you monitor in Aider
- If you want to remove a client from the Dashboards for all advisors, simply deactivate the client. Deactivation will stop Aider from syncing with the client’s Xero data and remove the client from the Dashboard and Client Insights section for all users in your firm. You will no longer be charged for the deactivated client.
If you changed your mind, simply go to 'Clients Management' to reactivate them. - If you simply want to remove access to this client for yourself or another advisor – e.g. the client has been reassigned to a different advisor in your firm – then use your firm's 'Account Settings' > 'Manage Permission' form instead.
You can get to the 'Account Settings' section via the blue Aider menu bar on the left. - If you no longer work with a client and need to remove them completely, please contact our Customer Success Team.
- If you want to remove a client from the Dashboards for all advisors, simply deactivate the client. Deactivation will stop Aider from syncing with the client’s Xero data and remove the client from the Dashboard and Client Insights section for all users in your firm. You will no longer be charged for the deactivated client.
Manage who has access to a client
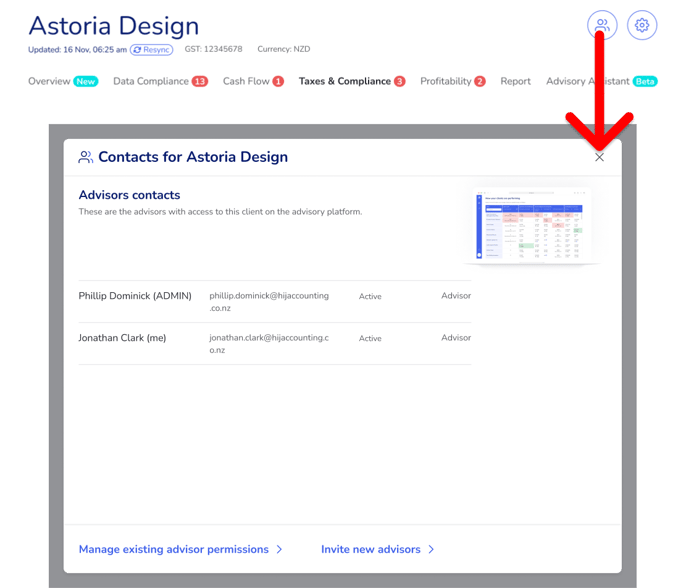
- To find out which advisor(s) in your firm have access to a particular client, click on 'Client Contacts' (
in the top right corner) > ‘Advisors’.
- If an advisor is missing, either click on the 'Invite new advisors' link if they don't have access to your firm's Advisory Platform yet, or 'Manage existing advisor permissions' if they're already logged into the Advisory Platform but just need access to this client.