Updated: 17 June 2024
Quality data is the foundation of both compliance accounting and financial advisory. But bringing clients’ recordkeeping to a complete and accurate state is often time-consuming. This affects your bottom line and ability to offer value-add advisory services.
Aider’s Period Close tool helps you centralise and automate your data due diligence tasks, so that you can…
- Spend less time on this hefty admin task
- Run your compliance services more profitably
- Offer or scale your advisory services
Contents:
Clean up your client’s data efficiently with Aider’s Period Close tool
Aider helps you...
- Filter out the noises in the raw figures.
- Focus on anomalies and trends (variances) that require review and actions.
- Consolidate checks across multiple Xero Reports to give you a clear view of the client’s data status.
- Easily get to the relevant Xero screens to investigate further and clean-up the data.
- Customise and add your own steps to enforce your data due diligence process.
- Collaborate and track your progress with comments and notes.
- Evidence your data diligence work with a downloadable copy of the checklist for your workpapers repository that has the full details including comments you added.
What types of data checks are currently available
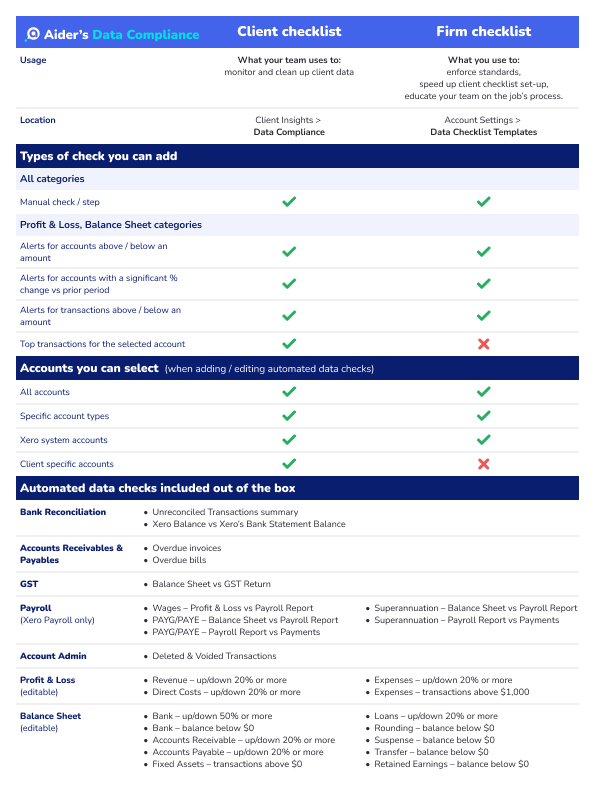
Aider offers you 3 types of checks to centralise and automate your data checklists:
- Common Xero data check that is preconfigured with automated alert
This includes:- Unreconciled transactions
- Xero Balance vs Bank Statement Balance
- Overdue Invoices (aged receivables)
- Overdue Bills (aged payables)
- GST on Balance Sheet vs GST Return
- Deleted & Voided Transactions
- Key financial statement data checks that you can customise
We’ve preconfigured a few common variance and balance checks for you.
You can tweak these and add more at the firm level for all clients, or at the client level for specific clients.
Use this for:- Profit & Loss account and transaction checks - e.g.
- Revenue material (high value) transactions
- Expense accounts with significant variance vs previous period
- Top transactions from an account
- Miscoded assets (based on transaction values from relevant accounts)
- Balance Sheet account and transaction checks - e.g.
- Accounts that should be $0 at end of the period
- Asset and Liability accounts with significant variance vs previous period
- Overdrawn shareholder accounts
- Miscoded expenses (based on transaction values from relevant accounts)
- Profit & Loss account and transaction checks - e.g.
- Additional manual step that you can add
Use this for:- Checks that involve data outside Xero - e.g.
- Tax authority portals
- Other business systems
- Document repositories
- Your workflow process steps - e.g.
- Manager sign-offs
- Client communication
- Audit documentations
- Period locking
- Checks that involve data outside Xero - e.g.
Key features of Aider’s Period Close tool
The tool consists of three key elements:
- Period Close Dashboard:
What that you use to monitor and prioritise client data cleanup tasks. This is an aggregated summary of all your activated clients' Period Close tasks. It has deep links to alert details and comments - making it easy for managers to keep a tab on these Period Close jobs.
Find out more > - Client checklists - ‘Period Close’ tabs in ‘Client Insights’:
What your team uses to monitor and clean up an individual client's data - Firm checklist templates - ‘Period Checklist Templates’ in ‘Account Settings':
What you use to enforce standards, speed up Client Checklist set-up, and educate your team on the job’s process.
Client checklists
To access these checklists, go to ‘Client Insights’ > ' Period Close'.
1. Checklist & Period Selectors, Download button
-
Select the type of checklist and the period you want to work on.
-
Use the Monthly Checklist to review transactions or balances that meet the alert criteria for completing any monthly reporting, advisory, or bookkeeping services you provide. You can also use this to better manage your GST/BAS and Annual Accounts workload by spreading the work evenly throughout the year.
-
Use the GST Period Checklist to review transactions or balances that meet the alert criteria for completing the GST/BAS returns.
-
Use the Annual Checklist to review transactions or balances that meet the alert criteria for completing the year end and year to date accounts.
2. Checklist Status:
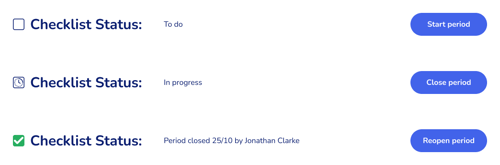
- Use this to track the progress of the checklist.
- Click on the ‘Start period’ and ‘Close period’ buttons to change the checklist status.
- You can also reopen a period if necessary.
3. Checklist Categories:
Related checks are grouped by category to help you stay organised and efficient.- Category status:
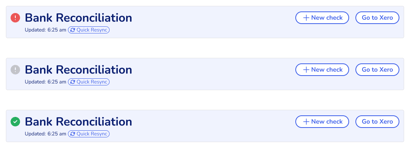
- Red alerts = 1 or more checks have data alerts or have not been reviewed.
- Green status = all checks have no data alerts or have been reviewed.
- Grey status = 1 or more checks shows data alerts, but the alerts have been marked as reviewed.
- Category update timestamp + Quick Resync button:
This shows you when the data and alerts were last updated for each category of each period. If you suspect there might be more recent data in Xero, you can:- Update all data for this client
Click the “Resync” button at the top of the page.
Note this may take awhile because of the volume of data and calculation required. - Update just the reconciliation data for the selected period
Use the “Quick Resync” button next to the category update timestamp.
This is quicker than the standard resync. Use this when you are working only on the reconciliation task and need to see your changes reflected immediately.
- Update all data for this client
- ‘+ New check’ button allows you to add new checks to the category.
The type of checks you can add depends on the category.- Manual check / step
All categories.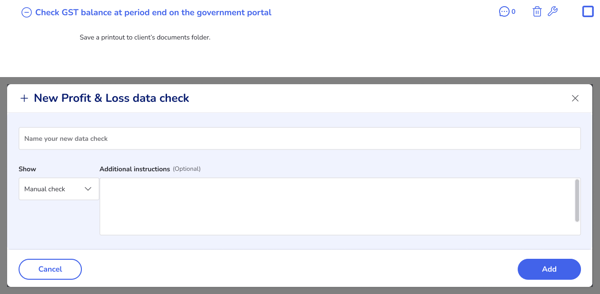
- Alerts for accounts above / below an amount
Profit & Loss, Balance Sheet categories only.
Trends / % changes (variances) are pre-calculated for you to speed up analysis.
- Alerts for accounts with a significant % change vs prior period
Profit & Loss, Balance Sheet categories only.
Trends / % changes (variances) are pre-calculated for you to speed up analysis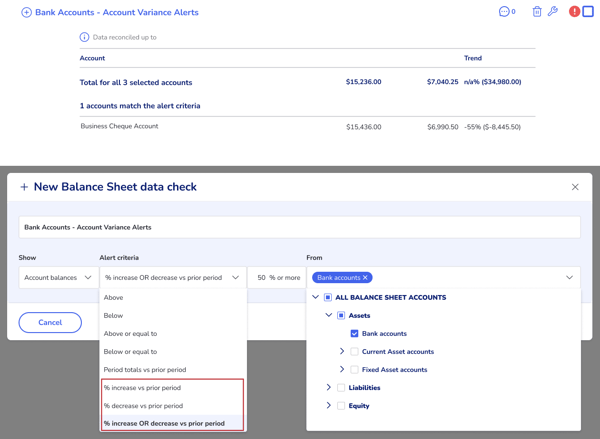
- Alerts for transactions above / below an amount
Profit & Loss, Balance Sheet categories only.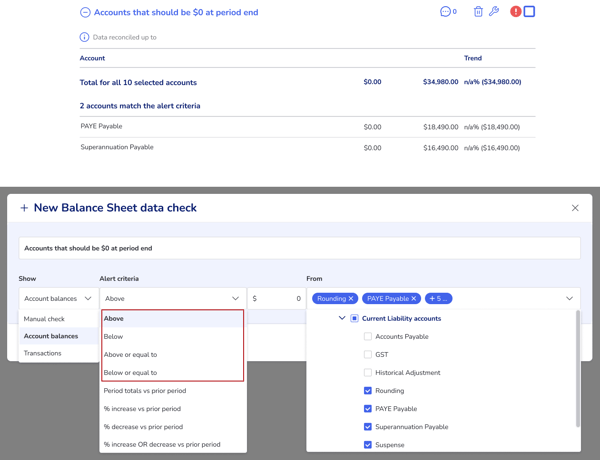
- Top X transactionsTop transactions for the selected account
Profit & Loss, Balance Sheet categories only.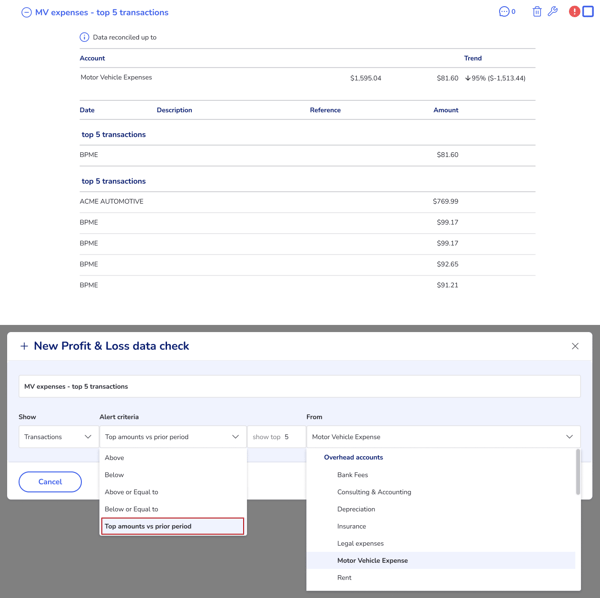
- Manual check / step
- ‘Go to Xero’ buttons take you to the most relevant Xero screens where you can investigate further and clean up the data.
Please note:- Once on the Xero screen, you may need to change the date range and Account settings to see the corresponding data for the period you selected on the Aider checklist.
- There may be additional transactions and activities added during the day after the last sync update. So some figures shown may not match 100%. The last update date-time is shown at the top, below the client’s name. Click
to resync Aider with the latest Xero data.
4. Checklist Item Summary:
- Item Summary:
- For pre-configured Xero data checks - this indicates the nature of the check and summarises the key detail.
- For checks that you added - this shows the name of the check you specified.
- For both - Click on
to see more item details.
- Item Comments:

- Allows you to add text notes to a checklist item.
- Click on to add a comment or read existing comments.
- Use this to add progress notes and additional details as required to evidence your due diligence check.
- The comments are included in your downloadable checklist to save to your workpapers repository.
- Item Status:
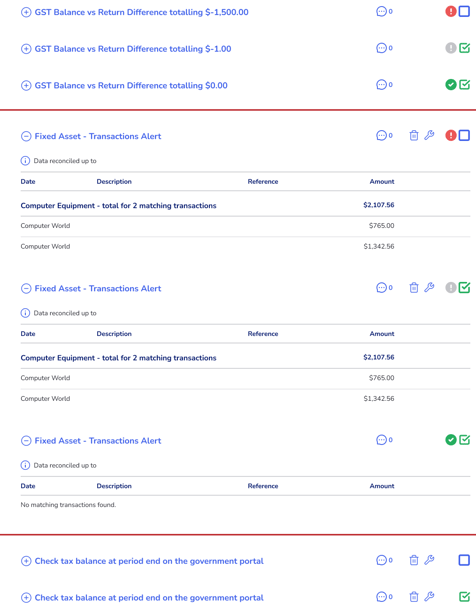
- Red alerts = data indicates issues or alert criteria met, or check has not been reviewed.
- Green status = data indicates no issues nor alert criteria met, or check has been reviewed.
- Grey status = data indicates issues or criteria met, but the alert has been marked as reviewed.
- Delete and Edit options: Available for checks you added.
- Mark as reviewed/done checkbox: Allows you to override data alerts or mark a manual check as done.
5. Checklist Item Details:
- The details vary depending on the nature of the check.
- Some include transaction, invoice, and bill level details.
- Some include useful pre-calculated subtotals, differences, and trends (variances).
- Some indicate the relevant compliance due dates and filing status.
- Any details in blue text are links to the most relevant Xero screens to facilitate further investigation and data clean-up.
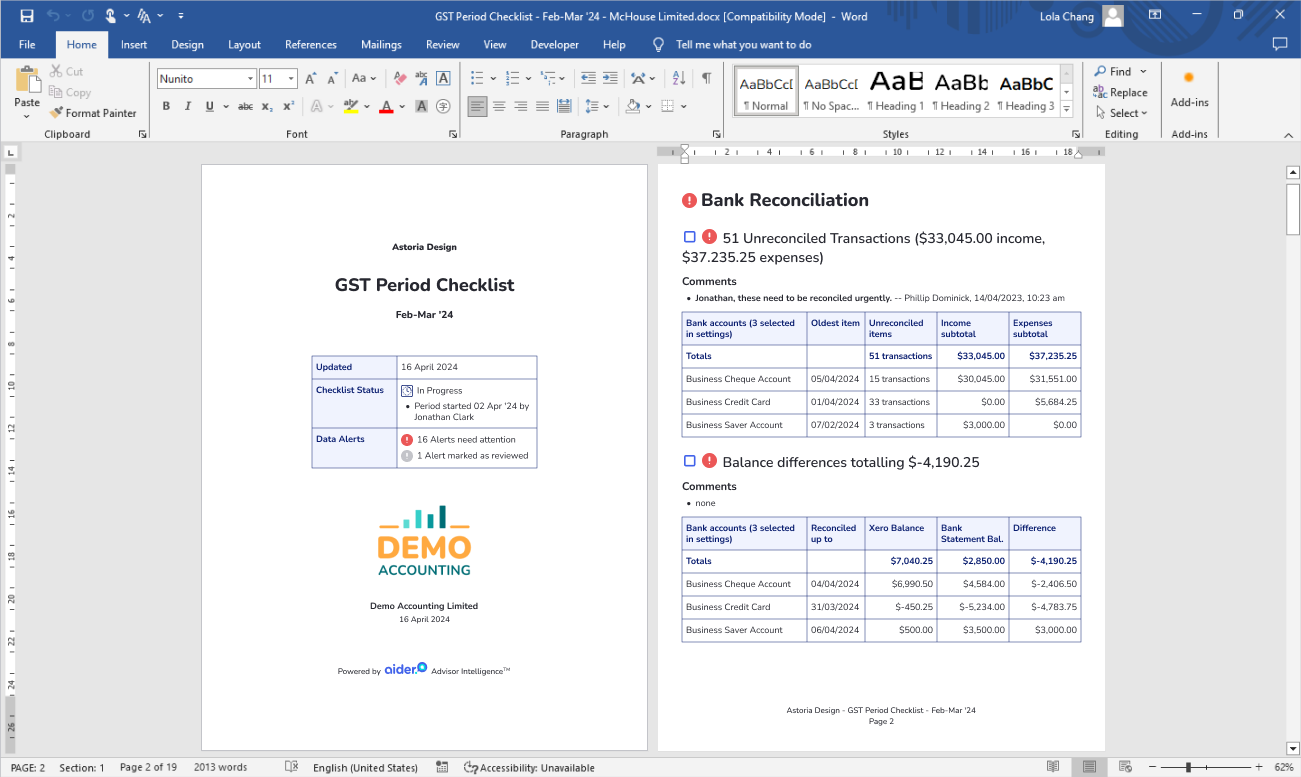
- This allows you to download the selected checklist as a shareable Word document that includes all of the checks, alerts statuses, details, and comments.

- When the Word document version is downloaded, you can open and…
- Add more comments and notes if required:
Either type directly into the content area,
OR select a word or data and right-click (Control-click on a Mac) to add a comment. - Print or save as PDF for your workpapers repository:
This makes the document not editable, which is better for audit trails.
- Add more comments and notes if required:
Firm checklist templates
To access these checklists, go to ‘Account Settings' > ‘Period Checklist Templates’.
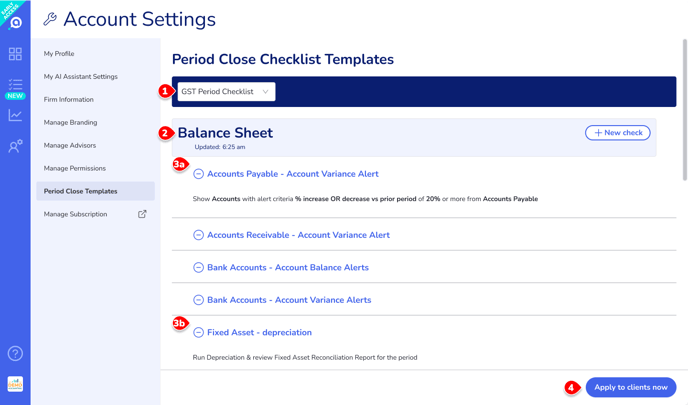
- Checklist Template Selectors:
- Select which type of checklist you want to set default transactions and balance alerts for. These defaults will be applied to all clients and can be customised at client level.
- Use the Monthly period template to set the default criteria for transactions and balance alerts to be applied to all clients for the Monthly Checklist.
- Use the GST period template to set the default criteria for transactions and balance alerts to be applied to all clients for the GST Period Checklist.
- Use the Annual period template to set the default criteria for transactions and balance alerts to be applied to all clients for the Annual Checklist.
- Checklist Categories:
- These are the same as on the client checklists (Period Close tab).
They allow you to group related checks together to help your team stay organised and efficient.
- These are the same as on the client checklists (Period Close tab).
- Checklist Items:
- Only checks that are edible are shown. These includes:
- Any checks that you and your team added.
- Profit & Loss and Balance Sheet automated data checks provided out of the box.
- Click on a check’s name to see more details:
- Automated data checks will show a summary of how the check is configured.
- Manual checks will show any further instructions you provided.
- Only checks that are edible are shown. These includes:
- Adding and editing checks:
- Like on client checklists, you can add new checks to the categories. You can add any type of checks except for “Top transactions for the selected account”.
- Selecting accounts for new checks: at the firm level, you can select:
- accounts by type - e.g. all Expenses accounts.
system accounts that all clients have in their Chart Of Accounts by default - e.g. "Accounts Receivable"
- accounts by keyword matching - e.g. any client accounts with the keywords "vehicle", "motor", "car", or "truck".
You won’t be able to select accounts that are totally unique to a specific client - e.g. "Toyota truck".
- accounts by type - e.g. all Expenses accounts.
- Applying firm checklist to client checklists:
- Changes you make to the templates are automatically applied to all of your client checklists overnight during the daily client data updates.
- If you want to apply the changes straight away, click the “Apply to clients now” button.
- NOTE: If your team customised a firm checklist item for a specific client, then any further changes you make to this item in the template will NOT be applied to that client. The customisation at the client level will be kept instead.
Client & Firm checklists comparison