Updated: 31 January 2024
The Client Insights section contains all the key information you need to work efficiently with an individual client, including support for:
|
Pricing your accounting service correctly
|
 |
| Period close tasks Monitor and bring a client's data to a complete and accurate state. Find out more > |
 |
| Performance advisory tasks Monitor and alert the client to potential issues with profitability, taxation, and cash flow. Find out more > |
 |
| Advisory report generation Deliver impactful reports to clients with different needs, at scale and with ease. Find out more > |
 |
|
Better advice & communication with AI assistance Save time and effort with Aider’s private and convenient Generative AI assistant. |
 |
e.g. calculation settings, custom tags, what colleagues have access to this client.
Find out more >
Complete your tasks efficiently with Aider's Client Insights
- Filter out the noises in the raw figures.
- Focus on anomalies and outstanding tasks.
- Focus on the significant trends (variances) and performance patterns.
- Spot trends and patterns more easily with graphs that even your clients can understand.
- Spot early signs of issues with our Early Warning System
(estimates and forecasts based on analysis of historical data using artificial intelligence). - Communicate key insights with your clients easily via email.
- Or try out Aider’s ‘Report Pack’ beta feature - a customisable, small-business friendly performance report that includes an Executive Summary and action points drafted by Generative AI.
(A beta feature is a sneak peek of a new software feature, where users can try it out for free and provide feedback to help our software team make improvements before the official release.)
How to get to and navigate the Client Insights section
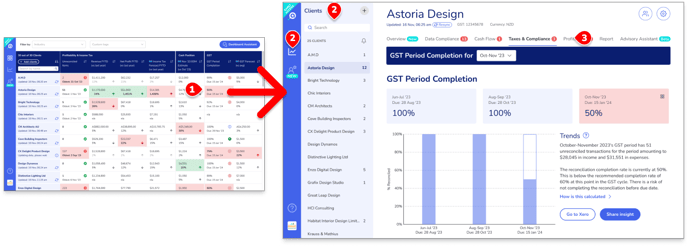
- From the Dashboard:
Click on any data cell to get to the corresponding Client Insights page.
Use this approach to investigate significant trends shown on the Dashboard.
- Using the Aider menu bar:
Click on to go to the Client Insights section.
Use the Clients menu panel to find the client you want. - Once in the section, use the tabs under the client’s name to navigate between the client’s Period Close checklists, the various types of performance insights - Cash Flow, Taxes & Compliance, and Profitability- and advisory tools such as the Report Pack and the Advisory Assistant.